Pages

Friday, 28 March 2014

Thank You

Hello friends,
Can't believe how fast the week has flown by and it's friday already. Weekends are the most awaited time for my family, when DH and DD are at home and it's the time when we just put our feet up and let our hair down :)
And now onto my card:


This card is inspired by a very versatile sketch by Sam Simpson at Cas(e) this sketch#70Addicted to CAS- Luck and CASology-Lucky.


I struggled with this week's cue card 'Lucky' or 'Luck' and googled about it when I came to know about St. Patrick's Day which is an important day in Ireland and is also observed in many other countries. I also came across the images of three-petaled clover leaf  which is believed to be symbolic of good luck. Well, so I wanted to include that into my card(in a subtle way).

For making this one, I sponged some distress inks(tumbled glass, salty ocean, faded jeans, mowed lawn) by masking the portions some paper with torn edges.I loved the outcome torn edges give on inking. The birds and the clover leaf petals are all hand-drawn and fuzzy cut and then popped over the card base using foam dots. Sentiment is from Inkadinkado-floral delight stamp set.

This card is dedicated to my family and friends who have stayed with me and supported me through thick and thin. Just want to thank you and let you know how LUCKY I am to have you all in my life :)

Thank you so much for your encouraging words on my work always. 
Have a great day!!

Monday, 24 March 2014

Lattice-window Card

Hello Friends,
Sharing a card today, made this lattice-window card keeping in mind a few challenges. I made a lattice window mini note card last year and always wanted to make another one in a standard size. I just kept postponing it but  when I came across Indira's beautiful lattice-window cards and her brilliant video tutorial on lulupu, I got inspired to make it again. Do check out Indira's blog for all her lattice window cards. I just love them. Here's my card:


The background is made by sticking powdered glitter over the white base, letting it dry and then sticking the black window panel over it. The flowers are stamped, fussy cut and coloured using watercolours and distress inks. The leaves are hand-drawn and cut. Finally, added some bling, a punched butterfly and the sentiment.

Supplies used:
Stamps- Inkadinkado(floral delight), Deep red cling stamp(large flower)
Camlin watercolours and distress inks
Small butterfly punch
Rhinestones

Linking it to:
1. http://colorconceptionschallenges.blogspot.in/2014/02/glam-with-glitter-challenge.html
2.http://lulupu.blogspot.in/2014/03/challenge-27-lulupu-2nd-birthday-special.html
P-Pink, Powdered glitter, Punches
C-Card stock
L- Lattice-window


3.  http://fusioncardchallenge.blogspot.in/2014/03/fusion-card-challenge-6.html ( Have used the sketch as well as the flowers in the picture as my inspiration)


Friday, 21 March 2014

Make-over Magic


Heyy Everyone,
Hope you all are doing great. This time, I pushed myself to try something new and came up with an idea of altering a box.

CAUTION: PICTURE HEAVY POST.

Pictures are as follows:

I think this picture is self-explanatory:--


....following are the steps to explain the make-over process.
 
1. Applied a layer of homemade gesso over the box.(Sorry, forgot to take that picture)
2. Stuck black paper all over
3. Stamped the BG stamp from prima londonerry collection using Versamark ink and heat embossed it using Lindy's mistletoe EP( Since I don't have a heating tool, I used a sandwich maker to heat it, and it worked just fine)
4. Inked the edges using Memento dew drop inks(angel pink, lulu lavender) and stuck the card stock pieces over the black base.
5. Decorated it ( phew!!! it took me over 10 days to finish decorating it....but no worries, atleast I managed a decent attempt at something that's not my style ..lol)


All the roses are handmade and inked using memento dew drop inks. The silver embellishment that you see in the top left corner is from one of my broken hairclips. Stamped the Tilda on a cardstock and coloured using watercolours. Have stuck some slver glitter along the edges.


The white lace is from my stash and I have stitched to to give a ruffled look before sticking it along the ttree sides of the box. Stuck some pearls over the lace.

Made a flap for easy opening of the box by using the border punch and patterned paper from DCWV stack.
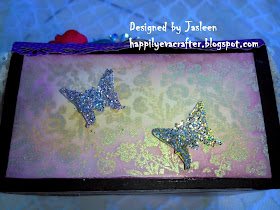
Punched a couple of butterflies and covered them up completely using powdered glitter. Stuck them  over the front facing panel.( Thanks to this powdered glitter, my home is SPARKLING now :P)

On opening
On the inside


Finally added a 'Best Wishes' stamped tag. Now the box is ready to be filled with homemade chocolates and that would make a fantastic gift for a loved one, isn't it? :)


How do you like my attempt at this style? Thanks so much for stopping by. 

Linking it to:
Lulupu 2nd Birthday Special --3rd Category-Altered box
L-Lace, Lindy's Embossing Powder
C-Card stock
P-Patterned Papers, pearls,punches
T-Tilda, Tag

CCC-Glam with glitter( Used powdered glitter over punched butterflies and along the edges of the stamped image)


Wednesday, 19 March 2014

Blushing Blooms

Hello everyone,
Sharing a CAS card today after quite a while. My hands being quite full lately, not getting enough time to craft or blog much.  Anyway, thankfully managed to squeeze in some 'me' time to make this card for a few challenges. This week's CASology- Week 87 where this week's cue card is BLUSH.
Here's my take on it:


The word BLUSH made me think PINK. Instead of colouring the blooms in pink, I involved some masking-stamping and masking-inking techniques to give a pink radiance to the blooms. The stamps are from 'Deep Red Clings' (the bigger flower) and Inkadinkado- Floral delight (for the smaller one). The bigger flower and the sentiment are stamped directly on the cardstock panel while the smaller flower is stamped on another piece of cardstock and stuck over it using adhesive foam. The sentiment is from Fiskars -All around quotes stamp set. Finally added a minimal amount of bling and mounted this panel on a white card base.


Also linking it to :


DL.ART-Challenge #128(Use an uplifting sentiment that is more than 5 words)

Love to create Challenge- CAS card

STAMPlorations- March Challenge-Stamps and spring

PPS-March challenge-CAS

Thanks for stopping by. Have a beautiful day!!


Thursday, 6 March 2014

Just Arrived

Hello Friends,
There's this challenge going on at Addicted to CAS where the code word  BABY really appealed  to me. I just love seeing and making those cute baby cards, they make me happy :) There are so many ways we can make them.

Here's my take on it:


I love making dimensional cards and for this one too, I drew the  basket on a separate piece of card stock using a black permanent marker and coloured it using distress inks.Then fussy cut it and stuck it over the card base in such a way that it looks dimensional. Made the handle of the basket from a white card stock and  wrapped a quilling strip around it. Punched out two feet and inked them as well. Then assembled them alongwith a piece of tissue paper inside the basket in such a way that it looks as if the baby's little feet are peeking out :) Stamped little rings using my memento inks, stuck a punched out butterfly over the handle and finally attached a hand-written sentiment to the basket.

Also linking it to:
CAS on Sunday-28-color-me-pretty.
Fairy tale challenge blog- Baby

Hope you liked my attempt. Thanks so much from dropping by !

Tuesday, 4 March 2014

CASology Week#85-CARNIVAL

Hello everyone,
I'm very excited today to share that I was invited to be a guest designer for this week's CASology Challenge#85, where the cue word is CARNIVAL.  Fun , isn't it? :)


Here's my take on it:

The word 'Carnival' reminds me of colours, bold and bright, and ofcourse the whimsical colourful masks with feathers. I wanted to make a card keeping this in mind. :)

The mask and the feathers are handmade. I have inked the feathers using my Tim Holtz distress inks and memento dew drop inks(yes, I'm enjoying playing around with my inks quite a lot these days). Made a mask from a piece of black cardstock and heat embossed the two extended edges using Lindy's mistletoe EP (Silver) for a more dramatic look.


Inked a corner of my white panel and sprayed some water over it.Then assembled the mask with feathers over it after letting it dry . Stuck a small rhinestone in the center of the mask for some bling and finally stamped the sentiment(from Fiskars-butterfly magic set). I kept the sentiment short to balance it with the boldness of the focal image.

Hope you like my interpretation of this week's cue word. Would love to see how you interpret this super-fun word. Please do play along at CASology Week#85 CARNIVAL. :)

Have a great day! 


Sunday, 2 March 2014

Pushing the Envelope(s)

Hey Everyone,
Toay I'm sharing a project I made using spare envelopes by giving them a makeover.

caution: Picture Heavy Post

Here are the pics:


 Yes, it's a Utility Wall Hanging made out of three spare envelopes. I have taken a few step-by-step pictures so that it's easier to understand the process.
The two corners are folded as shown
The rear side of the envelope, corners are secured using cello tape

The base paper is a red coloured handmade fiber paper that I have been hoarding  since long and now got a chance to put it to good use . I love it's texture. Covered the rear side using a black card stock. I forgot to take the pictures of the rear side, will try to take it soon and upload it.


The peacock and the swirls are quilled using 3 mm quilling strips.


 The spiral roses are also quilled using a white paper from a drawing book. After trying out many types of roses, I settled with spiral ones because I failed miserably at all my rose making attempts  they turned out really good finally. Phew!! :P What do you think ? :D

 Stamped the chevron texture stamp randomly for some grungy look.Finally decorated and embellished with some pearls and rhinestones


And this is why I call it Utility Wall Hanging :D

Linking it to:
LESSology-Happy Mail Day ( Sliding my envelopes inside just before the challenge door shuts close :P)
.itsy bitsy-say it with roses
Lulupu-2nd Birthday special ( Have used P- Pearls, Peacock;  T- Textured paper, Texture stamp; C- Chevrons ; U-Utility home decor)