
Heyy friends !!
I recently bought a couple of Jane's doodles stamp sets. I usually don't indulge in impulsive shopping, but Jane's doodles stamps are just too cute to miss, even a frugal shopper like me couldn't resist buying not just one, but two stamp sets together... ha! ;) And here's the card I made:-

Sharing a step-by-step picture tutorial of the process of the making. It's a picture heavy post. But the sizes have been adjusted. Hope you enjoy.

 |
| Jane's doodles stamp sets--Rain or Shine and Double trouble |


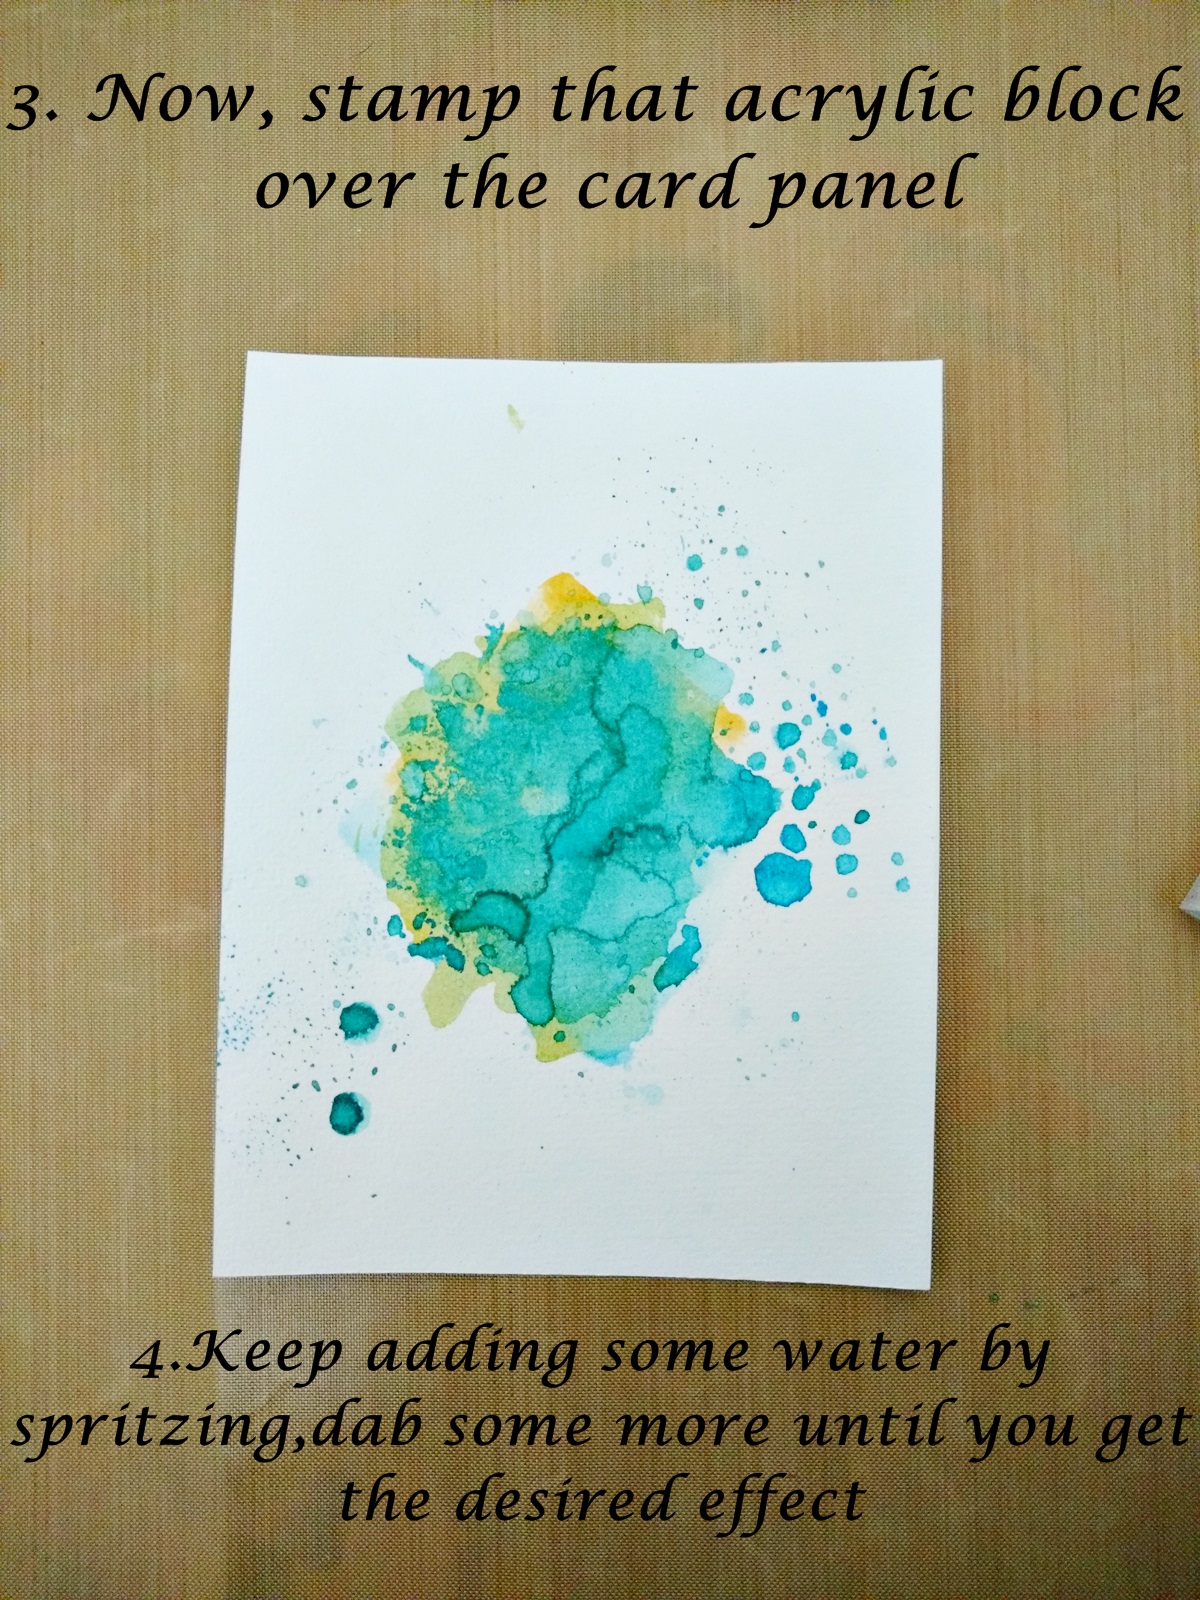


After the above step, the fuzzy cut images were put together and the sentiment was stamped in Archival, followed by versamark ink and clear embossing it. And this panel was then mounted over a card base.
here's the final look again:-
Let me know your views about this card. :)
Linking it to:-

3. Paru's Cardmaking Challenges--- New --- The stamps I have used are new to me and used them for the first time here.

Thanks so much for your visits to my blog. See ya soon .;)
BEAUTIFUL card Jasleen! You make such great smooshed backgrounds! Love the scene you have created on your cards...so adorable!
ReplyDeleteLovely tutorial and a smashing card!
ReplyDeleteVery cute card. Thanks for the pictures and tips of how to get the same effect.
ReplyDeleteHehe I too dont indulge in "stamp " shopping much [ though there are lots of other craft supplies I splurge on..ahem!] but had to get my daughter the doggy set Neha one showcased on her blog!! Thank you so much for the tutorial Jasleen...makes your card all the more beautiful seeing how you made it!
ReplyDeleteCheers
Dr Sonia
So so cute 😍
ReplyDeleteSo cute !!Loved the tutorial Jasleen .Ha ha Jane's doodle seems to be favorite among Indian crafter's specially after Neha has joined the DT :)
ReplyDeleteThanks for the tutorial Jasleen! Your card is very sweet!! :):)
ReplyDeleteSuchi xx
beautiful card Jas and well explained
ReplyDeleteThat's Such a cute Card dear ..loved the well explained tutorial too..!!
ReplyDeleteThanks for joining us at Peek-a-boo challenge # 2.
DT Vijaylaxmi ;)
Love the background and the way you constructed the card is fab to see x
ReplyDeleteJasleen -- what white card stock did you use on this awesome ink-smooshed card?
ReplyDeleteHi Fran ! Thanks for stopping by. :) I have used 180gsm watercolour paper. Couldn't find your blog link or email id, so replying here.
DeleteThanks -- what brand watercolor paper, please?
DeleteIt's a brand known as 'CAMPAP' .....don't know whether it's available where you reside, but you can try eBay or any other online craft store. :)
DeleteOne more question (sorry!): did you spritz the acrylic block FIRST with water after inking the block with Distress Inks before you smooshed the ink onto the watercolor paper? Or did you spritz the paper itself AFTER smooshing the inks. Unclear to me.
DeleteI spritz the acrylic block with water after dabbing ink pads over it, then smooshed it over the paper. Repeated the steps. But you can try spritzing on the paper too, it anyway gives beautiful results with distress inks and water. :) Sorry, I should have been more clear about those steps in my tutorial. Thanks for asking.
DeleteWow!! Your CAS cards are fabulous & this card is so cute! especially that small 'doggy'. Thanks for this amazing tutorial :)
ReplyDeleteThis is such a beauty! Love the splash of colours!!!
ReplyDeleteSuch a beautiful card Jasleen!! Love the colors you have used!!
ReplyDelete-Berina
Moxie Craftie
Lovely creation
ReplyDeleteThanks for joining us at the challenge !!
Sharada
DT PEEK-A-BOO DESIGNS
LOVE this sweet card. So bright, cheerful and fun. Great smooshed bacgkround. xx
ReplyDeleteAwww this so cuteee :) & the smooshed bg is jus awesome.! Lovely use of the color combo :) <3
ReplyDeleteSuch a pretty scene u have created, Jas :) SO cleverly incorporated very many stamps...Thanks for the tute :)
ReplyDeleteFabulous smooshing for your rain or shine theme, and a great tutorial.
ReplyDeleteThanks for sharing at Happy Little Stampers, Anita x
Beautifully made Jasleen! I justlove your peek-a-boo sun!!
ReplyDeleteThanks for playing along at Paru's Card Making Challenges!
A stunningly beautiful project created and love the way you have played with the right colours !! Thanks for joining us at the challenge
ReplyDeleteSharada Dilip
DT PEEK-A-BOO DESIGNS