Thursday, 25 January 2018

Guest Designing at CAS(E) This Sketch #256

Hi there!

I'm happy to share that I'm guest designing for this week's challenge at CAS(E) This Sketch. I had won one of their challenges few months ago and I was excited when Chrissy asked me if I would like to guest design for one of their challenges. I have always loved their sketches and I often use them to make my CAS cards. This week they have challenged everyone with a very interesting sketch. Check out below :-


And here's my interpretation of the sketch :-


Pretty clean, simple and quick one to make. Those hearts are from Sizzix Bigz die- Heartfelt, which are watercoloured using Gansai Tambi paints. The sentiment on the white heart is from My Favorite Things- Harvest mouse stamp set. I wanted to define the hearts more clearly so I doodled along their edges uising my micron pen. That's pretty much about the making process. Nothing too elaborate. 

Hope you feel inspired to participate in this week's CAS(E) This Sketch challenge # 256. :)


Thursday, 18 January 2018

Upcycling With Dies

Hi friends!

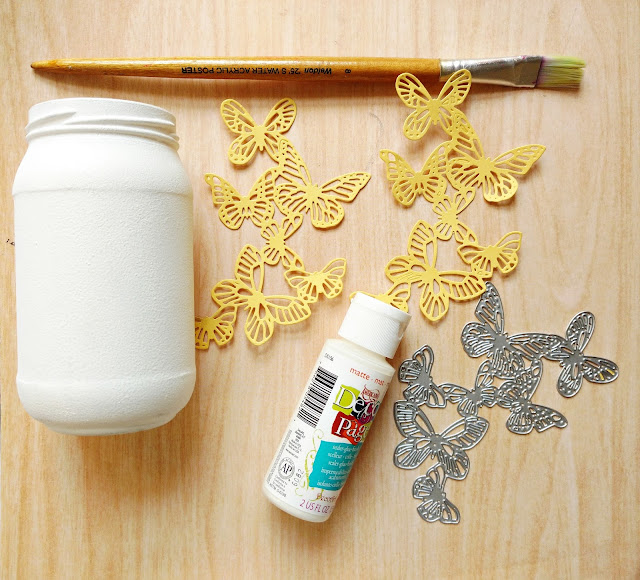
I'm sharing another home decor project today, this time it involves upcycling of an empty jam glass jar. I recently attended a workshop on decoupage by the talented artist Maninder Kaur of Rainbow Karftykari and although this is not exactly what the workshop was about, it sure gave me an idea to use some die cuts for upcycling a glass jar.

Recently received my new Chapter 1 dies from Sizzix Lifestyle(www.sizzix.co.uk) and they are all spring-themed, with beautiful butterfly and floral dies.


Products used :-


- A clean glass jar
- White Chalk Paint from Papericious
- Deco Art Decoupage Glue
- Flat brush
- Wood Varnish
-- Rhinestones
--Yellow cardstock


Method :-

I started by cleaning the surface of the glass jar using cotton and spirit(rubbing alcohol).
Then I applied two-three coats of white acrylic chalk paint using a sopnge , letting each coat dry before applying the next one. Then I arranged my die cuts over the glass jar and after I knew where I wanted them, I adhered the die cuts using decoupage glue. As we go on applying the glue and sticking on the die cut, slight pressure should be applied over the die cut using a tissue paper so that it adheres finely over the curved surfaces. Then I applied another coat of decoupage glue using the brush all over the adhered die cuts. 
For finishing the jar, I adhered some rhinestones and tied the baker's twine around the neck of the jar. Lastly, applied two coats of wood varnish over the complete jar.


And it's ready to be used as a centre piece of your showcase rack or dining table ;) 
Isn't that easy? 

Would love to know your views. 


Wednesday, 10 January 2018

Framed Wall Art Using Sizzix Dies

Hello bloggers and crafters !

I'm posting here after a gap of more than a month !! A few health issues kept me away from crafting and blogging during the past month but I'm better now, well-rested and energized, all set for something new and creative for 2018. Wishing all my friends and readers of this blog a very happy and healthy New year. Hoping to give more love and attention to my blog this year ;)

Today I'm sharing a quick and easy idea for a home decor and I was inspired to make this when I saw my friend Sindhu's idea HERE. I loved it and I thought it would be great to come up with one of the quotes that I would like to be reminded of everyday. Check out what I made :-


Those roses are made using Foamiran sheets and Sizzix Bigz Die 3-D rose. Making these flowers was very easy using this die. It also contains a leaf die to go along with the flowers. Adhering was done with the help of a glue gun. 

I prepared a 5 by 7 inches base using Iris sg card stock and added a light watercolour wash using Gansai Tambi water colours. I let it dry for a while and kept it aside pressed in a thick book so that it straightens out before I add anything to it.  Added the quote over the straightened base using Sizzix Thinlits die set- Delicate letters. These die cut letters are very thin and that's when a humble tweezer comes to rescue. It's easier when such delicate die cuts are picked up and adhered with the help of tweezers. 

The frame that you can see was made using 1 12 by 12 inches sheet of Kaisercraft pattern paper- Base coat and I followed this tutorial to make it >>> http://www.gatheringbeauty.com/2016/05/diy-3D-shadow-box-paper-frames.html


I hope you liked my attempt and first make of this year. :) Many more to follow. Have a great week !


Products used :-