Showing posts with label card. Show all posts

Thursday, 23 September 2021

Clean and Simple Card with MFT

 Hello bloggers,

I'm hoping you are are doing well.

It's been long since I participated in any card making challenges owing to time constraints. But this one challenge is something that I love to participate every year. Last night, I made a card for participating in  2021 Card Design Superstar Contest hosted by My Favorite Things for the Clean and Simple Genius category. 


I started by diecutting a watercolour paper panel using the LOVE die from MFT Die-namics. I stamped those cute pigs from BB Hog Heaven stamp set using Spun sugar distress ink. I did no-line watercolouring using Tim Holtz distess inks (coral pink, spun sugar). Adding a third piggie peeking through the "O" window was a last minute idea, just before taping down the panel over the card base. I love the idea of that cute piggy peeking out ;) After adjusting the panel and taping it down over a 6 by 6 inch card base, I stacked a few "LOVE" diecuts and added those to their respective negative spaces, except "O." Finally, added the sentiment from MFT- Hug in a Mug Stamp set--- I like how the sentiment feels complete-- "Love makes things better" :)


Thank you for stopping by. 


Tuesday, 10 May 2016

My Little House Box & Card Set | Sizzix Post

Hey Friends!

My new post is live on the sizzix.co.uk blog now and this week I'm sharing a sweet little gift box and a co-ordinating card I made using 661172- Sizzix Thinlits  die set 8 pk—My Little House by Sophie Guilar

Here's a sneak peek:-


Supplies from sizzix.co.uk:-
Please do visit the Sizzix blog and let me know how you like it. :)
Thanks for stopping by. Have a great week !


Friday, 10 July 2015

Catchy Design's : Let's Get Pinspired # 1

Hello Dear Friends!

My friend Deepti Stephens of Catchy Design is hosting a brand new challenge on her blog today which is all about getting inspired from some of the most amazing images found on the Pinterest and she invited me to be a guest designer for this month's challenge- Let's get Pinspired # 1. Thank you so much Deepti for this opportunity and I'm thrilled to be a GD at your blog. :)

What makes it even more exciting is the fact that it's being sponsored by Papericious , a Delhi-based company which comes up with exquisite patterned papers and the winner of this challenge would be receiving the gorgeous 12 by 12 Vintage Rosewood Paper pad. Tempting, isn't it? :)


Here's how I got Pinspired :--


There's so much to get inspired from in the picture. I loved the black and white background, the pop of colours- pink, yellow, blue , green, the worded background, the word 'Joy', etc.
I started by stamping my own background over the base of an A2 sized card. I wanted to use the word 'Joy' and some other words which would compliment each other . So I chose to stamp 'joy', 'hope', 'journey', 'thankful' from Heidi Swapp 'Journey' stamp set. I just love how interesting those fonts look. :)


Then I used this coloured vellum which was a result of  the coloured vellum technique I learnt in Clean and simple online class-4.A very simple and effective technique- just mix some distress ink of your choice with isopropyl alcohol (commonly known as rubbing alcohol) or nail polish remover and paint it over your piece of vellum. It dries super fast and the results look beautiful. The benefit of using rubbing alcohol over water is that water takes a long time to dry and it also leads to excessive warping of the vellum.

I drew and cut out those three feathers from a piece of white card stock, coloured them with memento inks, embossed the edges in enchanted gold EP (which could not be clearly seen in the picture) and arranged them over the base.

Finally tied a twine over the base to bind the whole design together and added the sentiment from mama elephant stamp set.

That's all from my side today. Please head over to Catchy Designs blog and check out the wonderful inspiration by Deepti Stephens and Pooja. I'm sure you'll love them.

Hope you join this absolutely fun challenge.  See you there :)

Thursday, 27 November 2014

Card with Mandala Quilling

Hello Friends!
 Sharing a card I completed today, inspired by the gorgeous picture at this week's Runway Inspired Challenge#72----Hervé Léger.

Here's the card:


 And here's where it got inspired from:


The main focal image of this card is done by quilling, using 3 mm quilling strips, in the shades of coral and red. The outfit shown in this week's picture is all about symmetry, with intricately embroidered design elements with a touch of gold. So, quilling was the first thing that came into my mind.

I wanted to bring some symmetry on my card too, so I chose to do it by quilling a Mandala {Mandala (Sanskrit: मण्डल Maṇḍala, 'circle') is a spiritual and ritual symbol in Hinduism and Buddhism, representing the Universe. The basic form of most mandalas is a square with four gates containing a circle with a center point. Loosely translated to mean "circle," a mandala is far more than a simple shape.}

Added a few gold rhinestones and matted the design on a piece of golden paper. Stamped the sentiment and the card was ready.


Love to hear your views on my work always. Thanks for stopping by.
Have a great day. :)

Tuesday, 19 November 2013

Follow your dream !

Hello everyone,
 I'm sharing a card I made inspired by the picture from Runway Inspired Challenge 48- Antonio Marras. Here are the pics-


I had this concept in mind since a long time, but wasn't having the right stamps. Now after I got them,I'm happy to execute my ideas :)  Firstly, I cut a window through the main card base with the help of a craft knife. Then, attached another peice of card stock of a suitable size at the back with the help of foam strips. The background is stamped using black memento ink and BG stamp from prima marketing. The butterflies were punched from black and while card stocks and coloured using memento ink. I have coloured one butterfly 'out of the window' and in green to express the idea of one butterfly moving away from the crowd 'going in the direction of its dream'. :) The sentiment is from fiskars-'all aroud quotes' stamps. This is the first time I have stamped and loved the results. 


Would love to hear what you think about this. :)

Have a fabulous day!! 


Tuesday, 29 October 2013

Good Things

Hi everyone,
 I'm back with yet another card for Lulupu- word play challenge. I'm having so much fun playing along and this is my third entry to that challenge. Love all the cute cards by DT members and my fellow crafting friends there. :D


Firstly, I made the background with the help of memento dew drop ink pad-dandelion using spray technique that I saw some time back in one of  the Deepti Stephens' videos. Loved this technique.:) Hand drew the pram and cut it out from two different pattered papers, and stuck it with the help of foam to give it some dimension. The little feet are punched out from a textured black matstack. Sentiment is hand written on a strip of vellum.

Dedicating this card to all my friends who have recently entered or are just about to enter the amazing world of parenthood. Yes, good things do come in small packages :D Stay blessed!

Hope you all like it :) Let me know :D
Have a nice day. 

Also linking it to:


Sunday, 20 October 2013

Shake it, shake it Baby ;)

Heyy Friends,
I'm sure you must be wondering the reason for putting up this weird title. You'll know the reason soon, but first let me show you a magic trick ;) (LOL, No, I haven't quit crafting and taken up magic :P).  Okay, here's my card:
Card kept flat
And here's the magic when I stand my card upright : Taddaaa :D
Card when upright
Did you notice? Okay, I'll explain. Yes, it's a Shaker Card(that's why the titlle:D) with a mechanism similar to an hour-glass in the background. I made two compartments on the other side of the card-one which we all can see, and the other one hidden just above it. And then I created a narrow passage for the stones to pass from one compartment to the other. That's why, when the card is held upright, the colourful stones fall down into the lower one. Sorry, I forgot to take pictures during making it; it would have been really easy to understand. I have used acetate for the transparent window. Have tried to give it a world 'map' like look, and used black permanent marker for the same. The words C. L, O, R have been made using quilling strips. The rest of the sentiment is hand written. I was inspired by JJ Bolton's similar card. I know mine's not as perfect as hers, but not bad  for a first timer,isn't it? ;)  More pics of the card:


Let me know how your views about this one.. I love reading your comments.:) 
Linking it to:
itsy bitsy -anything goes( the quilling strips used here are from itsy bitsy)


Monday, 14 October 2013

CAS Again

Hello dear friends,
First of all, wishing all my Indian friends a very Happy Dussera! Hope you all are having fun with the festivities around.
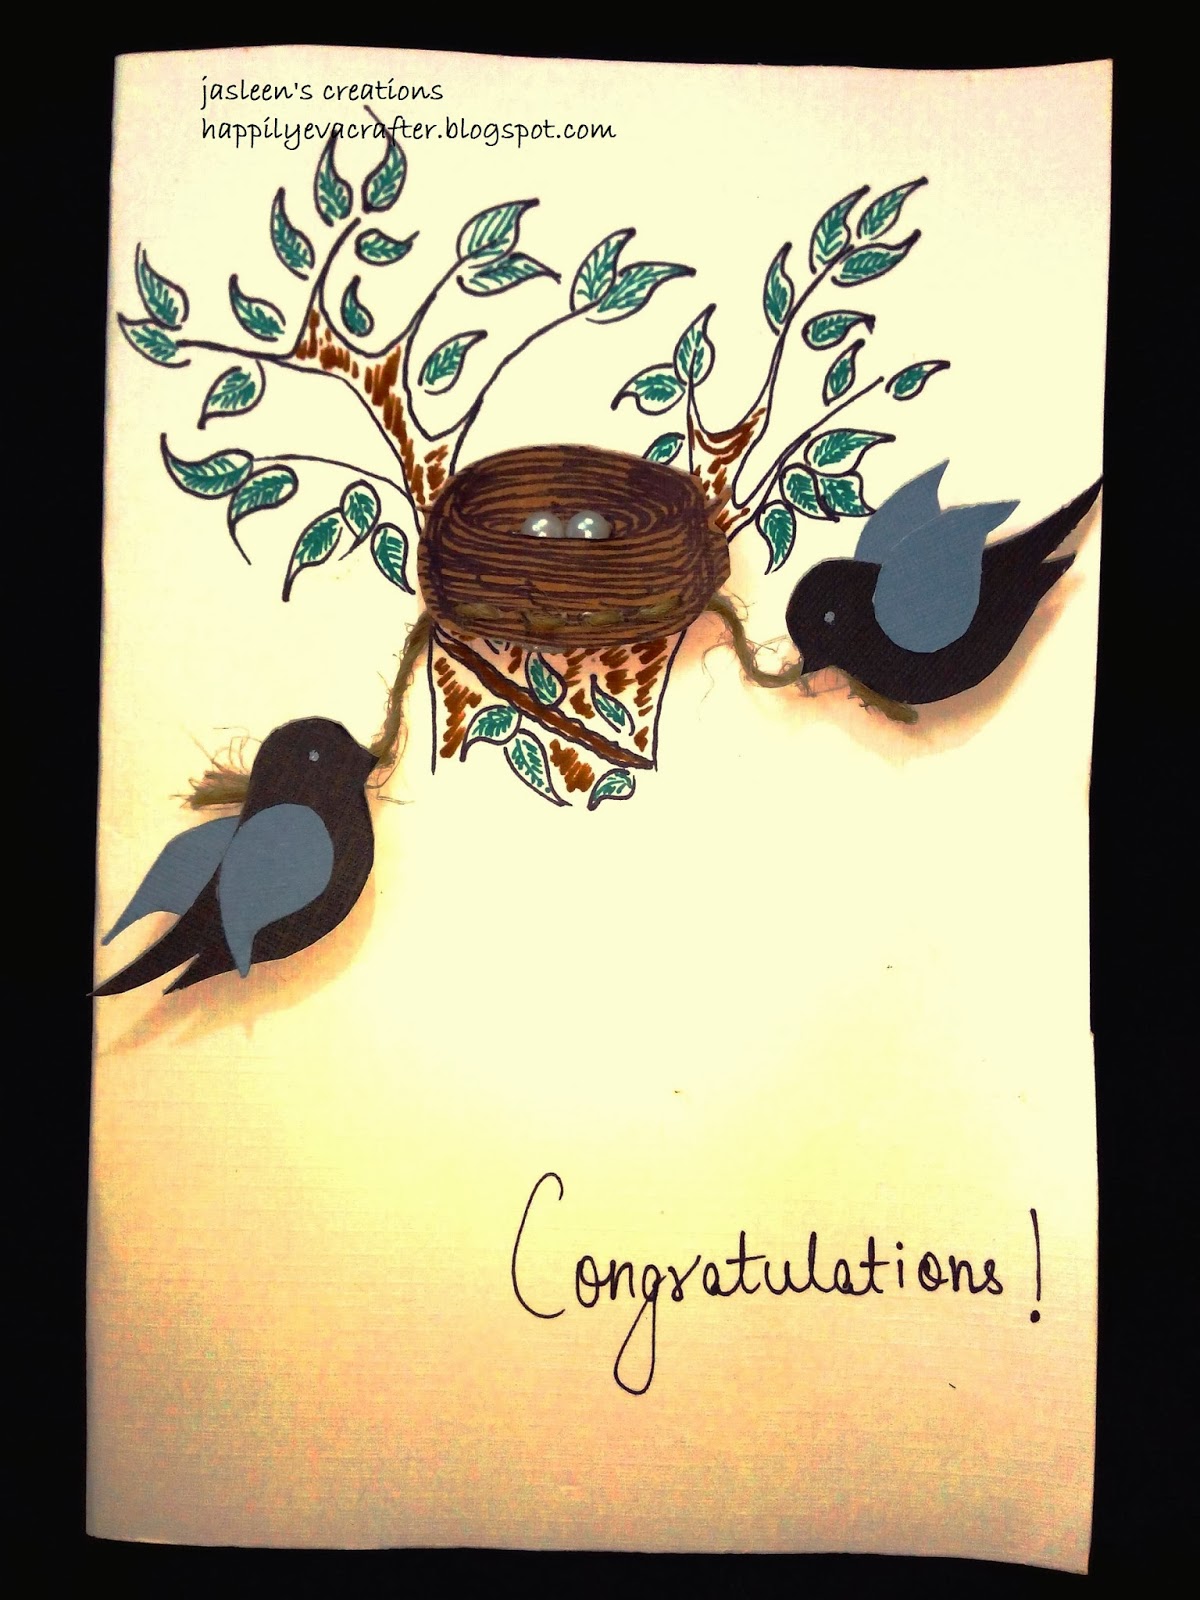
I'm here today with a fresh card for three fresh challenges-CAS(E) this sketch #49CAS-ual fridays #117(in stitches) and unstampabelles #28(stitching). Here's the card:
CAS card
So, I started this card by hand drawing the birds on the black and blue textured matstacks and cut them out using a pair of craft scissors. The nest has been hand drawn with a black permanent marker and cut out from a brown coloured textured matstack. Then I pierced a few small holes in the nest so that I can show some stitching with a natural twine. The nest and the birds are stuck on the white base card with the help of foam to add some dimension. The eggs in the nest are the stick-on white half-pearls. The tree and the leaves were hand drawn using permanent markers. Sentiment was hand-written.

a closer view of the stitching with natural twine
Thanks for dropping by. Have a fabulous day! :)

Linking it to:


unstampabelles #28-stitching


PS: Just came to know that crafter's corner is hosting a challenge "Cheers to New Beginnings'. So my fellow crafter friend Hridya suggested me to link this up there. Thanks for the idea dear ;) So linking it to Crafter's corner challenge #13-Cheers to New beginnings. And my card depicts many new beginnings-be it a new home, a new relationship, welcoming a baby, etc. Hope they like it :)


Wednesday, 9 October 2013

CAS-ing Along

Heyy friends,
I'm back with a CAS(Clean and simple) card that was made keeping two very interesting  challenges in mind.
Here's my card:
CAS card


Linking it to:
CAS(E) this sketch--I know I have modified the sketch a little, I just hope it's allowed and they like it :)
CAS-ual Fridays- included chevrons and sequins. I wanted to use chevron print as the background. But since I didn't have a chevron patterned paper, i used a simple stripes PP, and cut out the strips diagonally and stuck them together in a way to get a chevron pattern. If you see the card closely, maybe you can notice what I mean to say here :) Afterall, creativity is all about experimenting , isn't it? ;)
 About the doggie, I hand drew it on a piece if textured cardstock and cut it out(3 doggie faces and 3 pairs of paws) and stuck it accordingly in each pocket. The pocket is made from a patterned paper too and did some faux stitching for that real denim look ;)

Please feel free to tell me if you like it or not.  

Have a CAS-tastic day!!;)


Saturday, 5 October 2013

Star-fold Card

Hello everyone!
Hope you all are doing great! It's been about 10 days since I posted something new. The feeling of creating something lovely and sharing it with everyone to see is something I cannot explain in words.I am sure my fellow crafters would understand it. But sometimes I have to wait for a while to get this feeling, thanks to my 2-year old darling who's the center of my world and enjoys a good chunk of her mamma's time :) Most of the fellow crafters I know are mothers and some of them are working too,still they manage to come up with superb creations always. Hats off to them for this beautiful balancing act. I wish I learn to juggle like that :)

Okay, so today I'm happy because I've managed to complete a project and ready to share...yayy. It's a star-fold card and I got inspired by a card I saw on pinterest sometime back. I found it quite unique and wanted to try my hand at it. And I'm happy with the result. Here are the pics:


Star-fold card when closed

Star-fold card when opened
I did my first online craft shopping from Itsy bitsy and was excited to use the awesome supplies I got:
Materials I used:
patterned papers-the girl stack-Itsy bitsy
Butterfly punch- Itsy bitsy
4mm quilling strips-Itsy bitsy
3mm quilling strips and quilling tool-Local store
Pearls-local store
card stock-local store
permanent marker-local store

Quilled roses and sprig
The roses are made using 4mm quilling strips and quilling tool with the help of a tutorial I found on Inna's blog here.
The sprig of leaves was made using 3mm quilling strips and a comb with the help of a technique I learnt here.

Sentiment is handwritten with the help of black permanent  marker. Butterflies are punched-out.


Handwritten sentiment and punched-out butterflies

star-fold card
Do leave your suggestions or comments. I would really appreciate that.:)

Have a fabulous weekend!

Linking it to:
itsy bitsy-prettty with p- I've used everything-patterned paper, pink, posies, pearls
CAS on sunday-shape it up= Star-fold triangular card

Wednesday, 25 September 2013

Mini note card with envelope

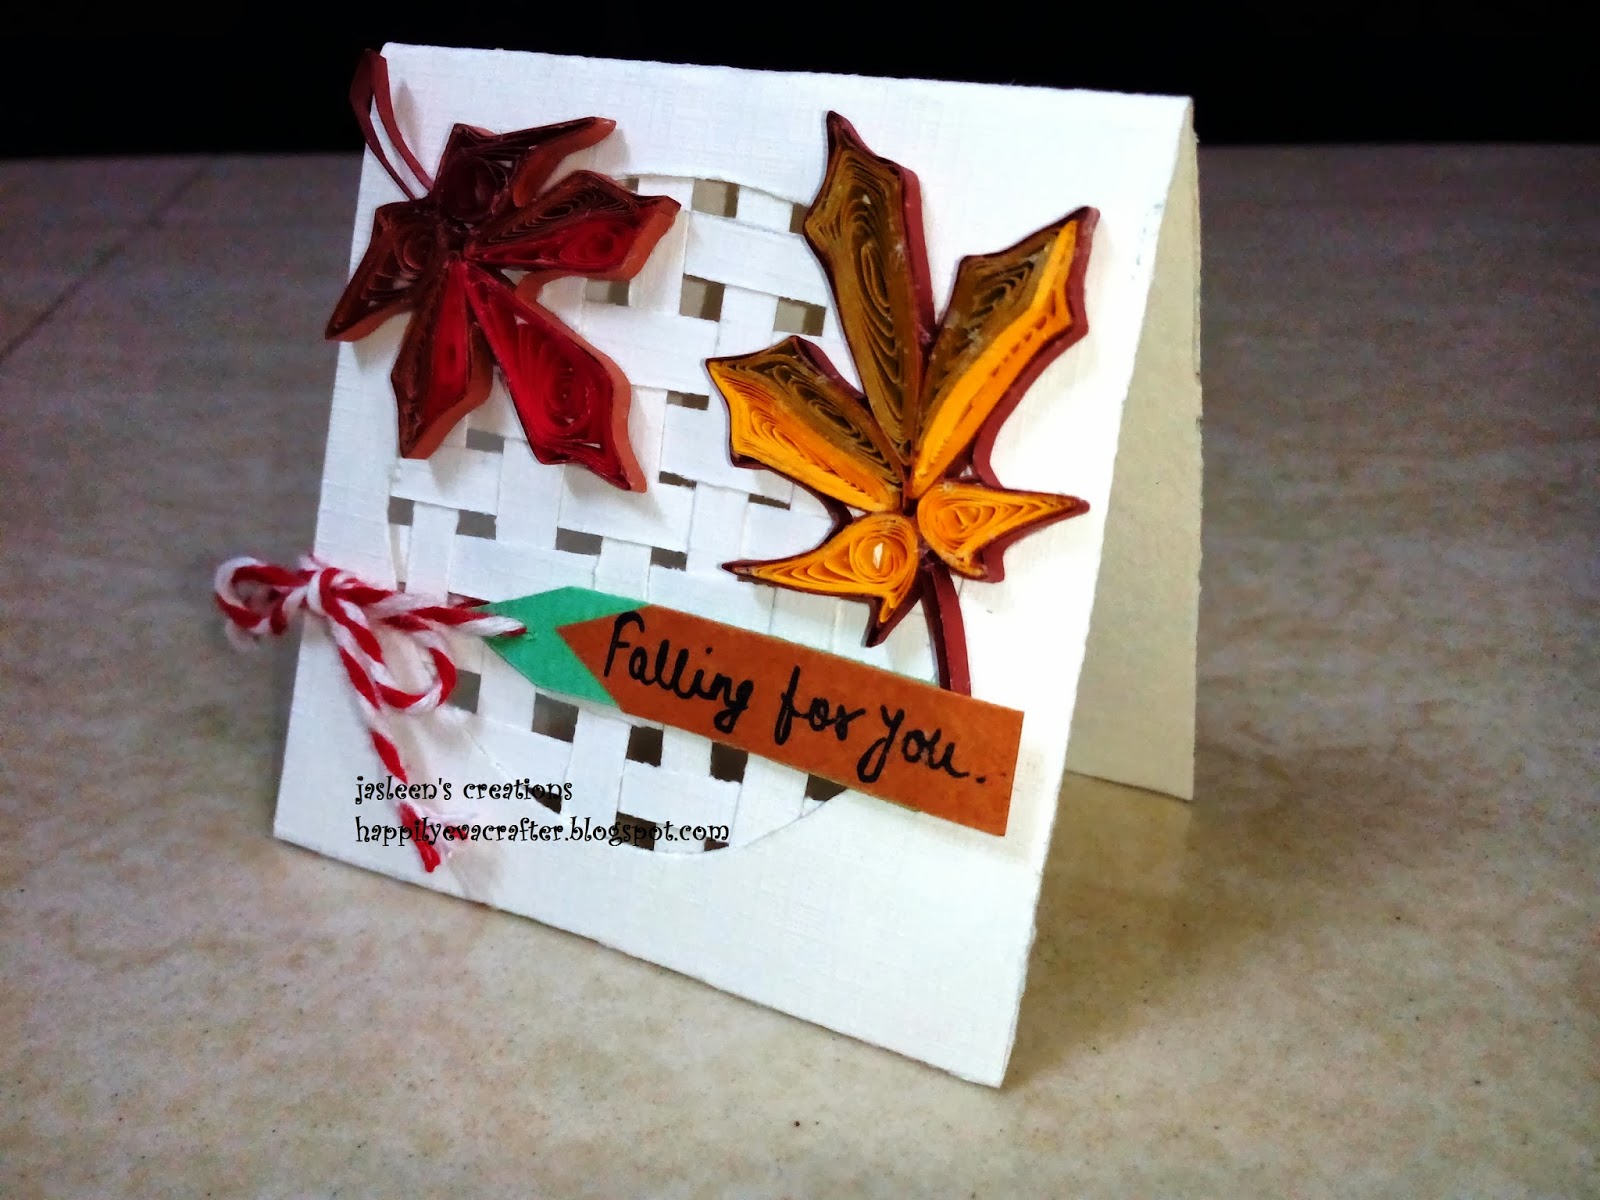
Hello fellow crafters, hope you all are doing great. It's feels so good to be back to the crafting world after a 15 day long holiday. I was away from home for a wedding and family vacation. Had great fun but missed crafting too. :) Now I'm back in action with a 3-by-3 mini note card with envelope for  catchy challenges.

This is the first time I have made a card this small and an envelope too. Must say, I had fun doing it. Personally I loved the idea of mini cards because they look so cute and pass on the message or the sentiment without being too pompous or over-bearing.

Here's what I created:
3" by 3" mini note card with envelope

Materials used: Textured white cardstock-for the card base and the latticework
Pumpkin and green cardstock for the envelope and the sentiment tag
3 mm quilling strips for the leaves
red and white twine.
The white leaves on the envelope are hand-drawn and cut. Sentiment is handwritten.

For making the envelope, I followed a beautifully explained tutorial here.


3" by 3" mini note card

envelope for the mini note card

3" by 3" mini note card with envelope

Would love to know how you liked it. Thanks for dropping by.

Happy Crafting !! :)

Linking it to the following challenges:


Tuesday, 27 August 2013

Sunshine Bliss

Hello dear bloggers,

This time I'm back with a colourful summer card which has been made keeping in mind some of the ongoing challenges.  Well, in one of the challenges, we had to choose any season or weather of our choice and create something based on that. What can be colourful and brighter than summer? Be it kids or grown-ups, don't we all await this season for different reasons ofcourse. Okay, please have a look.

 As you could see, quilled creations rule here. Reason: well, I'm hooked to quilling these days ;)
I wanted to try a quilled mermaid and got inspired by a mermaid I found on the internet on random search. So we have a quilled mermaid, sun, beach umbrella, a mocktail glass, and a slice of orange ;) And not-to-be-missed quilled sunglasses Sun is wearing..;) lol

Both the clouds and the sentiment is hand-drawn and handwritten


 Summer is also the season when the kids are on a 2 month long vacation(in India). So naturally it's the time when families flock away to cooler beaches for holidaying :) Tried to capture a relaxed vacation scene and hence the sentiment :)

Hope you all like it. :)  Waiting to hear your views.

Linking it to the following blogs:
http://lulupu.blogspot.in/2013/08/lulupu-challenge-15-weather-or-not.html
http://artisticinspirationschallenges.blogspot.in/2013/08/challenge-56-good-morning-everyone-we.html
http://itsybitsyindia.blogspot.in/2013/08/the-itsy-bitsy-for-kids-challenge.html
http://crafterscornerindia.blogspot.in/2013/07/crafters-corner-challenge11-anything.html
http://365cards.blogspot.in/2013/08/day-236-rainbowish.html

Thursday, 15 August 2013

Another attempt at Quilling

Hello there. Happy Independence day to all my Indian visitors.

I think I'm addicted to quilling. My first attempt at quilling that I posted two days back was far from perfect. Keeping those mistakes in mind, I came up with my new project and I know it's not perfect either, but it's much better.
I was inspired by Inna's creations for this and for making the leaves, I followed Annie's technique. I have still not mastered it and need to improve it.
http://anastasiaw.blogspot.in/search/label/quilled%20leaves. She has explained it beautifully.

Please don't hesitate to share your views and suggestions on my work. 
Have a great day!! :)

Tuesday, 13 August 2013

My First Quilling

These days I'm hooked to quilling. I didn't know anything about this art until recently when I saw some beautiful quilled creations on the internet. I loved it. I learnt about the basics of quilling on Martha Stewart's blog. This is what my first attempt at quilling looks like.