Showing posts with label CAS card. Show all posts

Monday, 2 December 2019

One for the Holiday Season

Hello, hello my dear blogger friends!

How have y'all been?

I've been MIA from the blogland since several months; I'm still learning how to find that (elusive) balance between managing my new job (that I joined in March this year), home and children. Experienced ladies, I could use some time-management tips from you ;)

I managed to make a couple of cards last weekend! Yayy for that! ;)

I'm sharing one of those cards in my post today.


The cutie image is from Your Next stamp-Sprinkles-Coffee and Tea and the sentiment is from My Favorite Stamps-Hug in a mug.
I started by slightly sponging the center of a 4 1/4 by 5 1/2 inches card front with distress ink (ground espresso). Next, I stamped a few snowflakes from the aforementioned MFT stamp set, using Memento ink (summer sky) for stamping. The main image was colored using Zig brush pens and it was adhered to the sponged area using double-sided foam tape. Finally, I stamped the sentiment and finished off my card with some color-coordinated sequins.

Linking this card to
Inkspirational challenge #201- Naughty| My card features a naughty bunny in the cup :)
Addicted to stamps and more challenge #369| CAS
Would love to know if you liked this one.
Thank you so much for stopping by.


Hugs!

Wednesday, 13 January 2016

Smooshed Background


Hey Friends!

Sharing a card I made inspired by this month’s Happy LittleStampers’ CAS challenge, where we have to incorporate the smooshing technique on our CAS cards.  I love distress inks and most of us who use these inks know how versatile they can be when it comes to techniques. Don’t we all love to see the magical effect they have when blended with water.  Quickly sharing a card for you all to see the smooshed background I made:-


For those wondering what smooshing technique means, it is a very technique by which we dab the ink pads directly on our craft sheet( re-inkers can also be used instead of in pads if you prefer), acrylic block or acetate, spraying a little water over that and pressing the card stock or the paper over the ink-water mixture. The effects it produces are very beautiful, artsy and unique each and every time. Quick, Simple and effective.

For the one-layered card above, distress inks (fired brick, spiced marmalade, squeezed lemon) and rose bud memento ink were dabbed on an acrylic block, some water sprayed over it and the block was dabbed over the card base. The layers were dried using Rangers’ heat tool before repeating the steps again, until the desired effect was achieved. After letting the paper dry thoroughly, stamped the sentiment from Inkadinkado-Kid’s quotes stamp set, in Archival black ink. Stamped the same sentiment again in versamark ink over the previously stamped sentiment and clear embossed it. This is a good way to add some interest to a simple card.

Stamped some colourful hearts here and there and finally added those handmade embellishments (colour palette and paint brush ) using 3D foam tape.

A real pep-me-up card. Don’t you think? J

I would also like to thank the amazing CAS design team members at Happy Little Stampers for choosing my penguin card as one of the favorites for the December CAS challenge J

Thanks for visiting my blog. Have a lovely day.

Love,
 

Sunday, 6 December 2015

Floral CAS card

Hello, friends !

Hope you all are doing well.

Sharing a card that I made last month but didn't share it on my blog yet.


To make this one,
  • I stamped the floral images from the Wplus 9 stamp set-- pretty little peonies, on a 5 by 5 inches card panel.
  • Stamped the same images on another piece of scratch card stock, fussy cut them and mounted them over the previously stamped images, using some 3d foam adhesive. This gives a nice dimntion to the focal image.
  • Then stamped the sentiment from Mama Elephant stamp set- true friends.
  • Cut out small pieces of silver glitter washi and attached these underneath the card panel to add an interesting add-on to the whole design.
  • Finally,added the coloured pearls and mounted the panel on a 4 1/4 by 5 1/2 sized card base.
 
I would love to get your feedback on this card. :)

Thanks for supporting me with your visits and comments on my blog.

Linking ths card to :
1. Allsorts challenge blog--CAS cards

2. Penny Black-December challenge--Anything goes with stamps


Have a great day !

Supplies used:
Card stock-- Iris sg
Stamps-- Wplus 9-pretty little peonies, Mama Elephant--True friends
Inks-- Memento inks-- rose bud, dandelion, paris dusk, summer sky, bamboo leaves, new sprout Archival black.
Silver glitter washi tape
pearls- locally bought


Wednesday, 7 October 2015

You're Rad !

Greetings !

Thank you so much friends for your kind comments on my previous card that I shared yesterday. Your motivation really keeps me going. :)

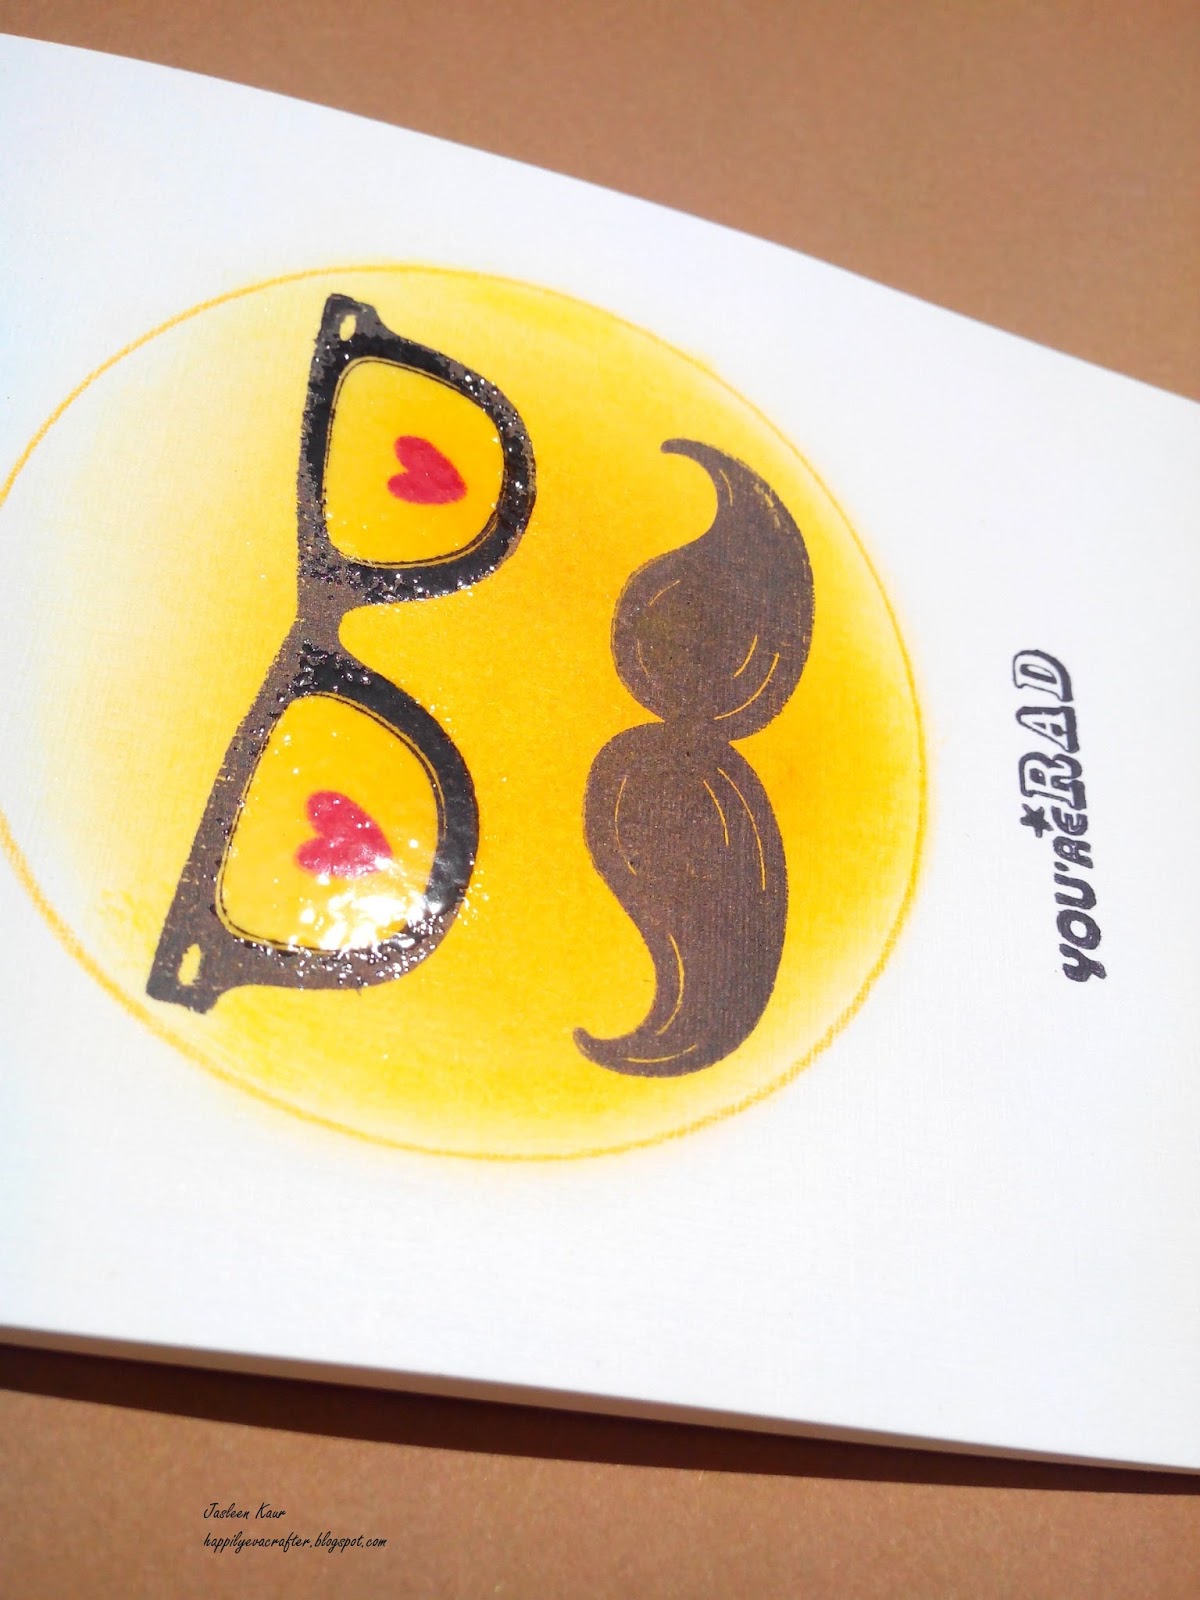
Sharing a fun card today inspired by this week's CASology challenge where the cue word is 'Silly'.  The moment I saw this cue word, I knew I wanted to play along. I usually make dreamy, scenic cards but with this challenge, I knew this was a chance to get creative and try my hands at making a cute, fun, 'silly' card. :)

Here's what I came up with :-


Well, this 'madly in love macho man' does appear kind of cute and silly and makes me giggle. :)
This was inspired by the very popular trend of using emoticons. They are everywhere on the social media and applications, isn't it ? So, keeping up with the trends and adding my own 'sillly' add-ons, this one-layered card came into being.

The Process:-
1. Drew a circle on the card base using a yellow colour pencil with a help of a circular stencil.

2. Keeping that stencil still in place, sponged the memento and distress inks in different shades of yellow, so that it somewhat looks like an emoticon.

3. Stamped the spectacles and the moustache from this hot off the press stamp set shown below, using Archival black ink.


4. Stamped the tiny hearts from the Waffle Flower bowtiful stamp set, using memento rose bud ink.


5. To give those spectacles a glimmer, applied versamark ink over the 'glass' area directly with my ink pad and heat embossed it with clear embossing powder. You can also use glossy accents for this step if you don't have the embossing tools and powder, the only downside of glossy accents being that they take a long time to dry, whereas clear embossing is quick and effective too.

5. Finally, stamped the main sentiment from the same 'hot off the press' stamp set and also added 'Oh Em Gee' on the inside of the card at the bottom, so that it peeks through and goes with an overall trendy feel of the card.


I think it would make a great 'Dad' card.  Let me know how you like this card. Does it make you giggle too ? :)

Thanks for visiting and leaving me your comments.

Tuesday, 6 October 2015

Embossed and Sparkly

Hello Friends !

Sharing a CAS card after quite a long time. Actually it seems like ages, if you ask me !!  About a year ago, I was bubbling with ideas and made at least one card everyday and shared on my blog too!  And here I am now, completely down on mojo, struggling to find time and ideas for making even a single card a week :( Hopefully, I get my mojo back soon.  Does this happen to you as well ? How do you bounce back?

I think the best way to start again is by participating in the challenges. So, I made a card today inspired by Cas-ual Fridays Challenge#144-Tic Tac Toe and Waffle Flower Challenge for October, where the theme is - Embossing and also Lulupu challenge- Embossing.

So, here's my card:-


For the Cas-ual friday's tic tac toe box, I chose to go along with the bottom row--Embossing, distressing and sparkling. 
And i got inspired a little bit from both the sketch and and picture from Waffle flower crafts 
To make this one, I stamped the image from the Penny Black Dazzlers stamp set, using versamark ink and heat embossed it using white embossing powder. It took me many tries to get this one right. After heat embossing, sponged it with two diffferent colours of distress inks and added a few rhinestones for that sparkle. Finally, mounted the white card panel over a kraft coloured card base , tied a silver string and added the white embossed sentiment from Waffle Flowers Bowtiful stamp set.


Would love to hear your views about my card. :)

Thanks so much for visiting and leaving your kind comments.


 .

Tuesday, 25 August 2015

Random Cards

Hello dear friends !!

Hope you all are doing well. As for me, I'm doing great and have been getting a few orders through my page on Facebook, although I take very limited orders as of now, but still find it difficult to blog on a regular basis as I used to earlier. Yes, I do miss blogging a lot. :(

Today I'm sharing a few cards that I made a while back but couldn't blog about then.

The first two cards were made to order for a friend who wanted to send them to her parents on their respective birthdays.


 For her father's card, she wanted me to make a CAS card showing a father-daughter bond in some way. So, I decided to show this in the form of silhouettes against a pretty background. I found a father-daughter silhouette on the internet, hand drew them on a piece of black cardstock and fussy cut them. (These two steps were the most time consuming part in the process of making this card, it took me quite a number of tries for getting the silhouettes right.) Then, sponged the scene on a white card stock panel, using distress inks and stuck the silhouettes over it using a foam adhesive tape.

To add some interest to the scenery, sponged the corners of the card base with memento inks, heat embossed a few leaves using white EP, and stamped a few of those leaves using the same toned memento ink.

And here's the second card:-


For her mother's card, she wanted me to show a garden with a big flower and a smaller one as the focal point. So I started creating the background by sponging different coloured inks through the kaisercraft brick stencil, over a white card panel. Then, stamped the silhouette meadow images from the Inkadinkado meadows stamp set, and also white embossed a couple of images (couldn't be seen clearly in the pictures).

Then I cut out a rectangular portion of this panel, matted it using same-sized card stock and then adhered it back over the card base, aligning it over the stamped panel, so that it looks like an inlaid die cut.
 Those flowers were handmade using pink and yellow coloured felt.

Linking the above card to:-
Create something catchy challenges--Week#4---- Create your own background

And here's the third card, which I had made about two months back as my DT project for Indian quilling challenge, but forgot to share it on my blog:-


You can find the details  about the making of this card here.


So, that's all fro my side today. Let me know how you liked each of these cards. Always love reading your comments :)

Thanks for visiting and have a great week. :)


Monday, 27 July 2015

Bokeh Technique on a Card

Hello there!
 Hope this post finds you in good health and spirit.

I have quite a number of projects waiting to be shared on my blog. Hopefully, I'll share them all this week.Today, I'll be quickly sharing a card I made while trying the Bokeh Technique. Well, let's just say, it's a very milder version of Bokeh background ;)

Here's my card:-


And here's the video by Dawn Woleslagle where I got inspired from>>https://www.youtube.com/watch?v=ghp6-Ga4wIA

Bokeh background needs more intense-looking white circles , but somehow, I liked this softer look so stopped stenciling more circles and let it be.
Will be coming up soon with some more cards using this technique.


Linking this card to:

Cas(e) this sketch#133


Hope you liked it. Thanks for stopping by.

Have a great day. :)


Thursday, 16 July 2015

Layered Embossing Technique

Hello Friends !

I made a card for the Cas-ual Fridays challenge where the theme is 'Embossing' and cas(e) this sketch challenge #131.And I tried a new technique by Jennifer McGuire, that I learnt in Clean and Simple online card class 4 earlier this year.
So glad that finally I found time to try this out. Here's my card:-


In this technique, you can see that the embossing is done in two layers, hence the name. Here's the step-by-step process I followed:-


  • Prepared my card base for embossing, so that the stray powder particles don't stick to the undesired areas. Usually you need a powder tool for this, but since I didn't have a powder tool, I just heated my card base area using my heat tool, the heat reduces the moisture from the paper and the stray powder doesn't stick. Thanks Rajni Chawla Ma'am for this useful tip.
  • Stamped 'celebrate' using versamark ink and heat embossed using Ranger's enchanted gold embossing powder.
  • Then, on a separate piece of card stock, stamped the solid balloon images from Mama Elephant -good times stamp set using memento dew drop inks.
  • Stamped 'celebrate' again overlapping the coloured balloon images and this time around, heat embossed them with clear embossing powder.
  • Fuzzy cut the images and stuck them over the gold embossed sentiment in such a way, that the word 'celebrate' appears complete. Used 3d foam adhesive to stick the images.
  • Drew those balloon strings with my microtip gel pen and stamped the sentiment' the good times'.
  • Added a few rhinestones and the card was complete.
Let me know how you like it. I love reading your feedback on my work always.

Thanks for visiting me and have a great day. :)


Wednesday, 13 May 2015

A Few Cards To Share

Hello fellow bloggers!!

How have you been? As for me, well, we relocated to a new city recently and that meant some crazy packing, wrapping up some last minute pending tasks required before moving, then house-hunting in the new city, moving in to a new place, unpacking.....pheww!! So you get the drift as to why I have been missing in action since almost past 2 months or so. ;) Although I'm still in the process of settling in completely, yet to get some unfinished tasks done, yet to unpack and arrange some of the stuff. But I'm taking it easy.

Just got my home internet connection here and guess what's the first thing I'm upto?? ;) ...So sharing some of the cards I made about two months back . Oh, how I miss crafting and blogging!! Hope to get back soon but until then, please check out these cards:--


This card was made for my guest designer post at  Create something catchy challenges for the month of March # Pinspired challenge. You can view the GDT post here

Here's the second card:


This card showcases the lovely floral stamps from the pretty peonies stamp set. I stamped the flowers  loosely using the outline stamps first, followed by filling them up using solid stamps. I have used memento dew drop inks here for the colours. 

And now for the third and the last card:-


This card was made to order by one of my friends who wanted a birthday card for her husband. She had informed me that her hubby is a gaming freak, tech-savvy and loved to read the computer-related books. So, keeping in mind these details, I came up with this card. I had seen a card which showcased the joystick die from My favorite Things and that's where this idea came from.  The shape of that joystick was hand drawn and hand cut from a black cardstock. Those buttons were made using enamel dots. The background was made using stamps from different stamp sets which suited the theme and helped me keep the card masculine.

Added the sentiment on the inside of the card.
 card on the inside

So, how did you like them all? Which one is your favorite? :)

Thanks so much for stopping by and leaving me your valuable feedback.

Hope to be back very soon. :)


Friday, 13 March 2015

Musical Congrats

Hello friends !!

Quickly sharing a card inspired by Cas-ual Fridays#137--Springtime melodies, where the challenge is to create a music-themed card in spring colours.

Recently, a friend of mine had requested to make a CAS  Congrats card for her friend who would be getting married soon. And since Indian weddings are incomplete without some music and dance, I thought why not make it a musical congrats. :)

Here's what I came up with:-
\


Pretty simple and quick  . Some masking, sponging, stamping and it was done. And it's one-layered too. :)

The music notes stamp is from Inkadinkado cling stamp set and the sentiment is from the alphabet stamp set from Inkadinkado again. Sponging is done using memento inks.

Hope you like it.

Thanks for visiting.:)

Sunday, 1 March 2015

Congrats

Hello friends,

The other day a friend requested me to make some 'Congratulations' cards for her sister and a friend who are getting married very soon. I was inspired by the sketch at CAS(E) this sketch challenge#112 to make one of the cards and this is what I came up with:-


And the sketch it got inspired from-

 I stamped the Penny black dazzlers stamps over a piece of card stock in a random manner, concentrating the stamping over the middle third area. Then I cut the stamped panel into two, to be arranged later. Then on the card base, I sponged some memento dew drop inks (angel pink, dandelion, new sprout, lavender, summer sky-- all lighter shades)  in the middle third area, stamped 'Congrats' using Inkadinkado alphabet stamp set and arranged the cut-out stamped panels over the card base.

Since it is supposed to be an Indian wedding 'congrats' card, I wanted it to have some celebratory and festive vibes to it and at the same time, keep it CAS. Hope I've succeeded at that and they like it.

Thanks for your visits and comments to my blog. :)

Have a great week !


Friday, 13 February 2015

More Love cards

Hi there !

Made a couple of love-themed CAS cards yesterday. Quite a number of 'love' themed challenges going around, so didn't want to miss playing along. ;)

Here are the cards:-


To start with, I gave a water colour wash in a small area of the card stock panel using distress inks. After it dried, I stuck a suitably sized Baker's twine in such a way that it read 'Love'. Then stuck a cute little handmade felt heart on one end of the twine (I made the heart by stitching two felt hearts together and stuffing it with cotton), added a few matching sequins and small pearls.  I thought sticking baker's twine in that fashion using the white glue would be difficult. But I was pleasantly surprised how easy and quick it was. That's why I ended up making a set of two cards :) Cute, eh?

Linking it to :-
1. Cas-ual fridays--- Watercolour love


2. Cas-ology ---- Love


3. Little tangles----- watercolour


4. AAA cards---- Love love love


5. Addicted to CAS----- Hugs and kisses( because hugs and kisses = love)


6. Just add ink#250(my card has a pink felt heart , just as in the picture)


Thanks so much for visiting today and hope you have a 'Love'ly week !! :)