Friday 27 December 2013

Celebrate !!

Heyy Friends,
Okay, this is my second post of the day and it may seem to you that I'm on a card making and posting spree :P lol. Actually my next few days are going to be super busy as we are shifting to a new home very soon and there's some serious packing to be done. So won't be getting time for a next few days to craft and just don't want to miss playing along a few challenges either. Okay, so without boring you with my story any further, let me show you probably my last card for the year 2013  ..;) -

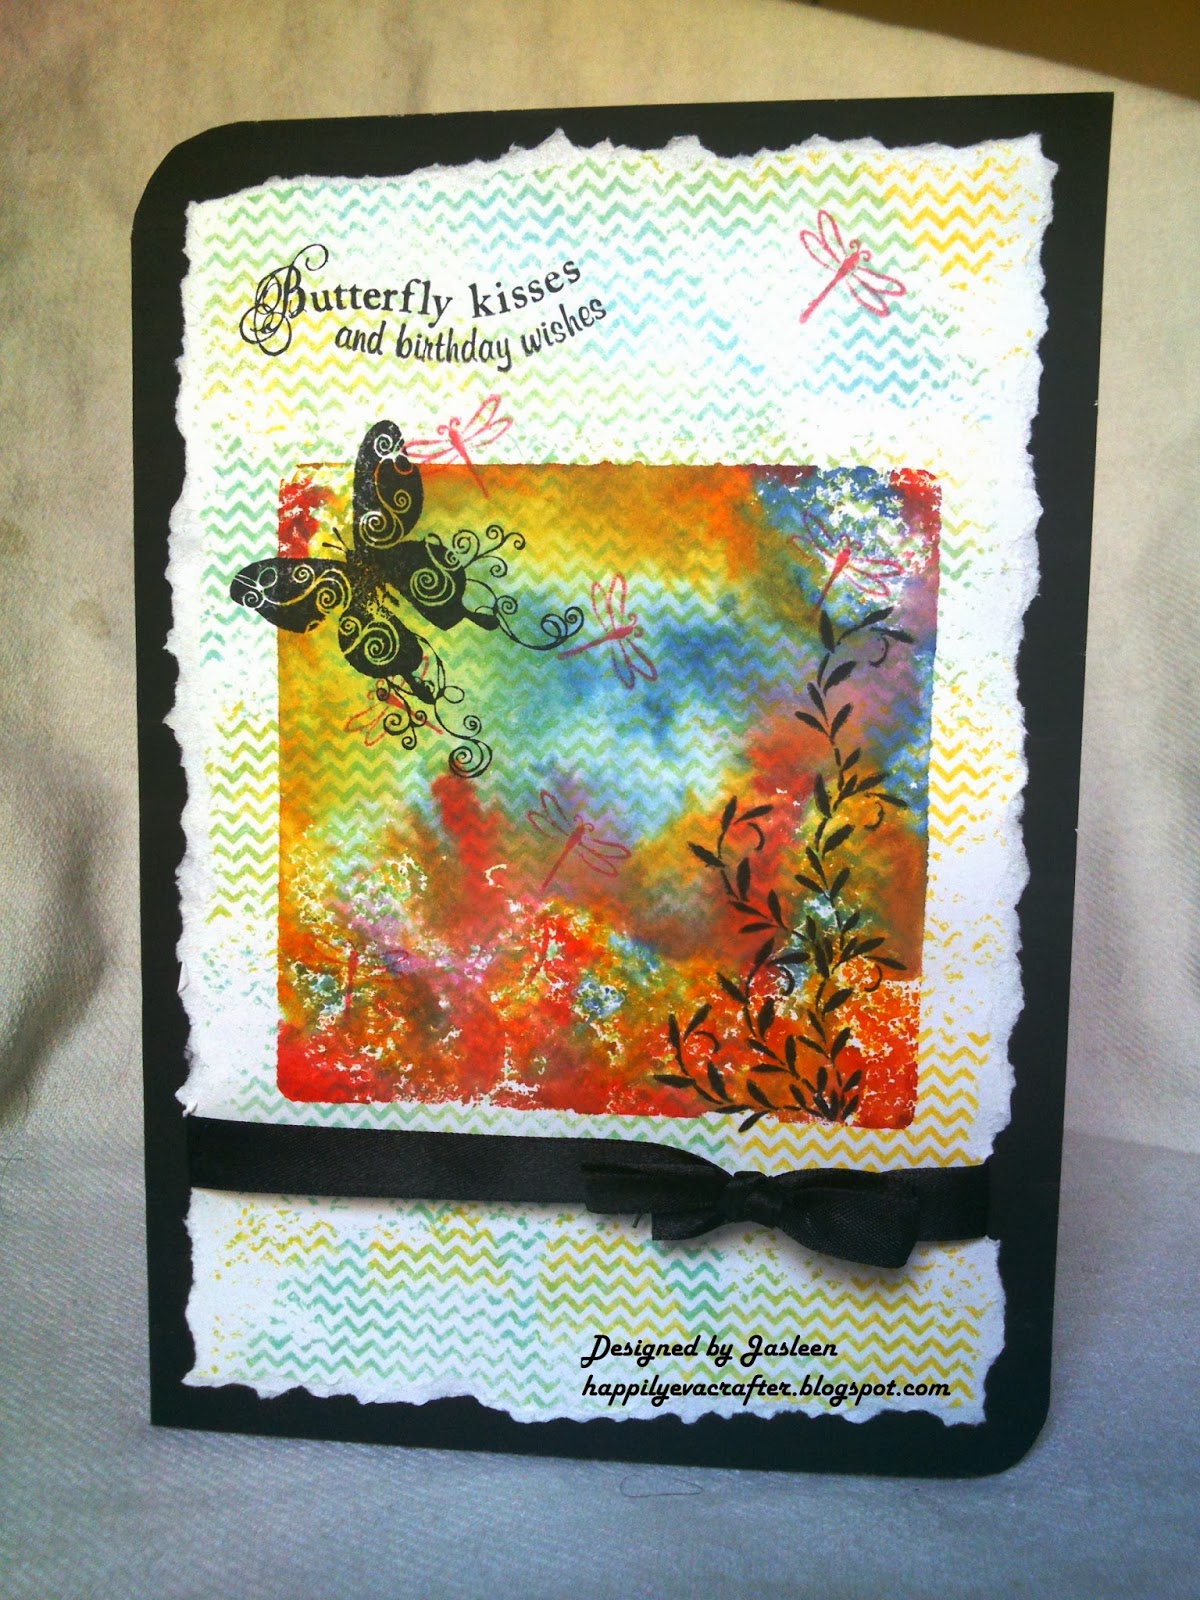
The technique I used is 'Tone-on-tone' Stamping technique. First coloured the strips of card stock with different distress inks and stamped with a BG stamp on each strip using a corresponding distress ink. It's very easy to do, and I loved the results. :)
I was inspired by Marion Vagg's card I saw on pinterest. Do check out her fabulous card here


The roses are handmade and I learnt to make them from very talented Dr. Sonia's blog. She has some amazing flower and other tutorials explained very simply. I distressed the flower petals to give it that 'shaded' look.
The sentiment is hand written on a piece of vellum.

My dear hubby loved this card because it's so colourful and vibrant :). How do you like it? 

That's all from me now. Wishing you all a very happy and a prosperous New Year. :)

Linking it to:


Birthday wishes

Hi friends,

A quick post to share a card I made for color conceptions challenge- stamping techniques. Here's the card:

The technique I used here is layered stamping alongwith acrylic block stamping.
To be honest, I'm not very happy with the way it has turned out and I think it could have been better. What do you think?

Thanks for your encouraging comments always. :) Will be back with a new card very soon. Until then, have a fabulous day!!

Thursday 26 December 2013

CAS cards and a good news :)

Hello everyone,
Hope you all are enjoying your holidays. If I talk about myself, the month of december has been a month of CAS cards for me..lol. And I'm still making and posting them. I love making CAS cards. Would like to share a good news, I got an honourable mention in the Casology week-75- KNIT and the same card was spotlighted at 365 Cards :) I'm  really happy. Here's the card I'm talking about:

 For the details of this card, please see here.


Sharing another card that I would be linking up to Cas-ual Fridays-124-Happy New Year and CAS on sunday- Happy new year


  Making it was easy. Just used some distress and memento inks for making the Sun and the clouds(masking and inking technique), hand drew the fence, the bird and the music notes and added the hand written sentiment. I tried to convey a beautiful message through this card- the Sun represents a new day or a new year or any new beginning and the bird is symbolic of any living being, who faces a new beginning with a new vigour and new hopes. Don't we all wish ourselves and our near and dear ones the same? :)

I'm posting the third card again in a single blogpost. For the details of this card, please see here.


Since I made and posted these cards after the challenge was announced, I think I can backlink them here and add all these three CAS cards to DCAM challenge-5-cas cards.


Let me know how you liked them all and which one's your fav :)

See you soon. Until then, Happy holidays and happy crafting :)


Sunday 22 December 2013

Lulupu Blog Hop 2013 and a challenge

Hello everyone,
 This is to share with you all about the Blog hop 2013 happening at  Lulupu blog this month. There are some amazing prizes to be won and some great inspiration to tickle your creative minds. For more detalis, hop over to the blog and have fun playing along.

Alongwith the blog hop, Lulupu is also hosting a very interesting challenge with a truck load of prizes to take home.

I 'm hopping with Lulupu, are you? :)

Merry Christmas :)

Hello dear friends,
 Wishing you all a very happy and merry Christmas. I'm sure most of you must be busy preparing for the Christmas celebrations. I can feel the festive mood all around me, shops have been beautifully lit and decorated with ornaments, all I can see is red, green and white :)

In the blogging world too, I can see so many beautiful Christmas themed cards. I got inspired to make one myself too :) Here it is:


Inspired by the sketch from Cas(e) this sketch# 58, I first made the snowbanks by masking and sponging technique(using faded jeans and tumbled glass distress inks) I learnt here. Then I hand drew and fussy cut the trees and the reindeer from a piece of corrugted cardboard and cardstock respectively. Coloured the trees using shimmer white pearl colour and the reindeer using silver gel pen.Stuck them on the base with the help of adhesive foam, wrote the sentiment, and my card was ready.

Thanks for stopping by and leaving me love. :)
Will be back soon, till then,
MERRY CHRISTMAS. 

Thursday 19 December 2013

Warm Wishes !

Hello friends,
 A quick post here to share a card I made inspired by the ongoing challenge at Casology # 75- Knit, and here's my take on it:


The ladies of my house are brilliant at knitting but unfortunately, I am not :P. So didn't show actual knitting in my card. lol 
For making it, I hand drew the basket on another piece of cardstock, coloured it using distress inks and fussy cut it. The little yarn balls are made by cutting out little circles from a sturdy card stock and wrapping it with the yarn to make it look like a yarn ball. I didn't have coloured yarn with me, so I coloured them using memento and distress inks. Have used toothpicks for knitting needles. Finally, before sticking them on the card base, inked the base area with memento dandelion to add a litle 'warmth' to the detail. The sentiment is hand written. 

P.S.-Sorry for the bad picture quality,  sadly my home is devoid of proper sunlight during winters.

Also linking it to keep it simple-warm
365 cards-recycled( I have recycled the yarn and the toothpicks)

Thanks for stopping by and leaving your sweet comments. :)

Wednesday 11 December 2013

CAS Trilogy

Hey everyone!
Hope you all are doing great. Today I'm sharing three CAS cards inspired by a few challenges. Have a look:


And now for the closer look of each card:

1. The first one is inspired by the ongoing challenge at cas-ualfridays blog-out on a limb. It's a CAS shaker card.


Making it was simple. hand drew the tree, made the shaker 'window', stamped the window BG with prima londonerry clear stamp(this stamp shows some pretty flowers and leafy vines,  which I thought went nicely with my 'imagination' ;)), inked the window bg, added some colourful sequins inside, inked the edges, added the sentiment..and that's it.


2. The second one is made by masking and stamping technique I saw on Michelle Bala's blog here. It's done by stamping with the help of a pencil eraser attached at the back of a pencil. I love this technique.Linking it to color conceptions challenge #6-stamping techniques. here's how it looks:
Well, I didn't find the name of this kind of technique anywhere. but if I have to name it, I'll call it  'Unconventional Stamping Technique'. hmm..sounds good :P.lol

3. The third card that you see below has already been posted a few days back here. I'm posting it again for DCAM Challenge-5- Three CAS cards in a single blogpost. And since this card was made and posted after the challenge was announced, I think I can add it here.


I really enjoyed making CAS cards. Hope you enjoyed seeing them. Thanks for dropping by. 
Have a great day! :)


Thursday 5 December 2013

(s)nail it with a ribbon-casology # 73

Hi friends,
 I'm back with a quick post to share a card I made inspired by the ongoing CASology#73 challenge and the cue word this time is 'Ribbon'. Here's my take on it:

I kept it very simple. Hand drew, fussy cut and inked the snail and added a coiled black ribbon as its shell. Stuck those googly eyes. Added a green PP from DCWV stack to act as a ground and wrote the sentiment in the speech bubble. That's all. 

Thanks for dropping by and leaving your sweetness.

Have a great day.:)


Sunday 1 December 2013

Priceless!!

Hello Friends,
A quick post to share a CAS card I made inspired by CAS-ology: Week 72-SHOP. I usually don't craft on weekends but this time I broke that rule. Just didn't want to miss playing along and Sunday was the last day to share my entry for this challenge. Here's what I made:

Well, the first thing that comes into my mind when I hear the word 'SHOP' is the price tag.lol.....Everything comes with a price tag, except the beautiful bonds of love we share with our near and dear ones-they are Priceless. That's what I have tried to convey here. 


The hearts are hand drawn and fussy cut and coloured using memento dew drop ink pad-rose bud. The meshwork behind the hearts is made with the help of strips cut from brown coloured textured card stock. The hearts have been stuck with the help of adhesive foam bits and covered with a layer of Rangers' glossy accents. Finally , I have tied the twine around both the hearts alongwith the handmade tag. The tag was made out of a piece of the thick glossy paper that I got as a cover for a cell phone accessory. So the bar code was already there.The sentiment'priceless' is written with the help of a stencil and black pen.

Thanks for dropping by. Have a 'Priceless' Sunday. :)

Also linking it to:

Wednesday 27 November 2013

Precious Memories

Hello friends,
 Today I'm happy to share with you my first scrapbook layout that I made for my 2-year old daughter Jasnoor. I did a lot of quilling after long. Before I go ahead,  let me warn you, this is going to be a long post with a lot of pictures since memories would be revisited ;) Here's what I made:


I planned this layout keeping in mind some of my favorite moments with my daughter right from the day she was born uptil 2 years.


 The quilled flowers are inspired by Inna's creations, dimension has been given to them inspired by Pritesh's tutorial and the swirls have been inspired by Susan's quilling.


I have used a thick 12" by 12" cardboard as the base and covered it with a light pink coloured PP from DCWV stack. I chose this PP with muted prints so that it doesn't overshadow the quilling. The yellow border is punched.


For making the sun, I have used a yellow smiley badge from my daughter's toys stash and the sunrays are made by inking and masking technique(handmade stencil and memento dandelion ink pad). I first learnt about this technique at Deepti Malik's blog. She has made some wonderful CAS cards using this technique.


The little booties that you see are also from my daughter's toys and belonged to a doll. I covered them up with  pink chocolate wrapping papers and embellished it with a punched butterfly. My idea was to show 'growth' over a period of time through those litte punched footprints and the little booties :)


Now over to the pictures:
The first pic from right- taken when Jasnoor was just a few hours old :)
The second one- Taken when she was 7 months old. I remember playing peek-a-boo with her and her toys. That was her fav game then. Now she loves hide-n-seek :)
The third one- Was taken when she was 16 months old. We were at Goa. There were these beautiful yellow flowers at the resort where we stayed. So took many pics of my daughter wearing one of those flowers, and how she loved posing!!! :) hehe.
 The forth and the largest one- That's the most recent one. It was taken at Shimla. If you have ever been to Shimla, you must be aware of the local ladies wearing these kind of long gowns with a head gear and jewellery. That's how she was dressed up and since she's a born poser :P, I had no difficulty in convincing my 2-year old to pose for this lovely picture. :)

I have made pockets behind each photo where I've inserted tags to write a few details about the pics.


Well, I think that pretty much sums up my 12" by 12" scrapbook layout. And if you are still with me reading this, thank you so much for your patience :P

Looking forward to read your lovely comments :)

Have a great day :)

Linking it to:
http://catchychallenges.blogspot.com/2013/11/keep-calm-and-go-girly-challenge.html

http://lulupu.blogspot.in/2013/11/challenge-21-magical-memories.html

http://lessology.blogspot.in/2013/11/lessology-challenge-31-toy-story.html( toys used- smiley badge as the sun, and doll's booties)

http://colorconceptionschallenges.blogspot.in/2013/10/create-scene.html( the flowers, the Sun, little birdie...all depicting a Garden scene)

http://beyondgrey.blogspot.in/2013/11/bgc43-create-shaped-projects-with.html
My picture inspiration is

Tuesday 19 November 2013

Follow your dream !

Hello everyone,
 I'm sharing a card I made inspired by the picture from Runway Inspired Challenge 48- Antonio Marras. Here are the pics-


I had this concept in mind since a long time, but wasn't having the right stamps. Now after I got them,I'm happy to execute my ideas :)  Firstly, I cut a window through the main card base with the help of a craft knife. Then, attached another peice of card stock of a suitable size at the back with the help of foam strips. The background is stamped using black memento ink and BG stamp from prima marketing. The butterflies were punched from black and while card stocks and coloured using memento ink. I have coloured one butterfly 'out of the window' and in green to express the idea of one butterfly moving away from the crowd 'going in the direction of its dream'. :) The sentiment is from fiskars-'all aroud quotes' stamps. This is the first time I have stamped and loved the results. 


Would love to hear what you think about this. :)

Have a fabulous day!! 


Thursday 14 November 2013

Seize the day !!

Hello everyone,

Sharing a clean and simple card with you today inspired by a few challenges.
Please have a look-


To make this card, first I drew the lines with the help of a black marker. Then with the help of a craft knife, cut a few slits along, and weaved the ribbon strands through them. The little blooms are drawn with the help of a stencil and coloured with the help of memento inks. I have tried to give the flowers a dimensional effect with the help of Ranger's glossy accents. Finally, used the sentiment from the vellum "quotes stack" by DCWV. 
The colours were inspired by the Runway inspired challenge-Alberta Ferretti and the sketch was inspired by cas(e) this sketch# 53
Also linking it to CAS on sunday- one layer wonder.


Hope you all liked it. Thanks for dropping by.

Have a fabulous day! :)

Tuesday 12 November 2013

TAG-ging Along--- Festive Style ;)

A big hello to all my friends !

Hope you all enjoyed  the festivities with your  near and dear ones. Today I'm sharing a tag inspired by a few challenges. This is my first tag and also this is the first time I made something that is all layered and loaded up. I must admit, I had a hard time figuring out how I should go with all the layering and adding details. I have seen a few crafters who are so good at this.

Here's my tag-


To make this tag, I used a thick base cut from the old wedding invitation cards. Then covered it with a blue coloured paper.

 For making the main background, I stuck sago seeds( known as 'saabudaana' in hindi) over another piece of card stock that was smaller in dimension. Whenever I saw these little pearl-like seeds in my kitchen, I used to have an urge to experiment with them. And I think I succeeded almost ;) Okay, after letting them dry,  painted it using three different fevicryl metallic paints(shimmer blue,green and yellow) to give it a shimmery finish. All the three paints were blended with the help of a paint brush. Then smeared some glitter glue over it. Here's how the completed background looks like-

For the embellishments, I made some ribbon flowers and stuck them over white foam net( we usually get this foam net as a covering for apples at the fruit  shops). The leaves and the glittery butterfly were a local buy.
Ribbon flowers
My favorite amongst all the embellishments is this peacock feather that was quilled. Yes, it did take some time to make this, but I think it was worth the effort.:)
Quilled peacock feather
Other embellies that I used are the lace at the bottom, the mirrors and the glitter ball in the centre to give that added sparkly effect. 
Finally, the sentiment is hand-written on a piece of vellum.


Let me know how you like it. Any suggestions??I enjoy reading  your comments.:)

Linking it to-
BGC- All that glitters( Have used a glitter glue and shimmer paints for the background,  glitter ball, mirrors(they are glittery too right?) , glittery butterfly, shimmery yellow ribbon flower, hope all that counts)